99% DIY Orchidarium Project
Login
User Name
Password   


Registration is FREE. Click to become a member of OrchidBoard community
(You're NOT logged in)

menu menu

Sponsor
Donate Now
and become
Forum Supporter.

99% DIY Orchidarium Project
Many perks!
<...more...>


Sponsor
 

Google


Fauna Top Sites
Register 99% DIY Orchidarium Project Members 99% DIY Orchidarium Project 99% DIY Orchidarium Project Today's Posts99% DIY Orchidarium Project 99% DIY Orchidarium Project 99% DIY Orchidarium Project
LOG IN/REGISTER TO CLOSE THIS ADVERTISEMENT
Go Back   Orchid Board - Most Complete Orchid Forum on the web ! > >
Reply
 
Thread Tools Rate Thread Display Modes
  #1  
Old 02-08-2022, 07:47 PM
kcpi3141's Avatar
kcpi3141 kcpi3141 is offline
Member
 

Join Date: Mar 2021
Location: NYC, NY
Posts: 50
99% DIY Orchidarium Project Male
Default

Quote:
Originally Posted by nemesis View Post
Thank you for sharing. This looks AWESOME. I cannot wait to see the finished product. I have a Beta in a fish bowl with some bamboo. Is this considered aqua scraping? Lol.
Thank you! If you have a nice betta bowl, then perhaps . I personally did something more along the lines of "nature aquariums," which is basically gardening with aquatic plants. A very satisfying hobby (everything grows soooo much faster lol) but definitely requires a good deal of sense and experience.


Quote:
Originally Posted by Steve83 View Post
Is your led dimmable? You might need to keep an eye on placement for lower light plants. Looking forward to the build
Yup the ballast has two leads made for dimming! The less current passing between those two leads, the higher the current going through the LEDs. I will be using a transistor to connect those leads and passing a PWM wave from a microcontroller to alter the current. With this, I will be able to decrease the intensity, simulate sunrise/sunset, and give brief periods of more intense light to mimic a more natural setting. If I ever get to it, I could also code in some light flashes to simulate lightning when the mist turns on!
Reply With Quote
Post Thanks / Like - 1 Likes
Likes Steve83 liked this post
  #2  
Old 02-08-2022, 10:36 PM
nemesis's Avatar
nemesis nemesis is offline
Senior Member
 

Join Date: Nov 2021
Zone: 9a
Location: East Texas
Posts: 178
99% DIY Orchidarium Project Female
Default

I was just kidding lol. My son is currently building his Aqua scaping business. The beauty and complexity of those projects is truly amazing. The tanks sitting in our garage are a joy to behold. I can't wait to see your orchid set up!
__________________
"Cry Havoc! and let slip the dogs of war!"
Shakespeare
Julius Caesar
Reply With Quote
Post Thanks / Like - 1 Likes
Likes kcpi3141 liked this post
  #3  
Old 02-09-2022, 12:03 AM
SADE2020 SADE2020 is offline
Senior Member
 

Join Date: Dec 2020
Location: Palma de Mallorca
Posts: 1,012
99% DIY Orchidarium Project Female
Default

I love this project, can wait to see the setup
Reply With Quote
Post Thanks / Like - 1 Likes
Likes kcpi3141 liked this post
  #4  
Old 02-09-2022, 02:03 AM
Diane56Victor Diane56Victor is offline
Senior Member
 

Join Date: Sep 2019
Location: Victor Harbor Sth Australia
Posts: 842
99% DIY Orchidarium Project Female
Default

Quote:
Originally Posted by nemesis View Post
I was just kidding lol. My son is currently building his Aqua scaping business. The beauty and complexity of those projects is truly amazing. The tanks sitting in our garage are a joy to behold. I can't wait to see your orchid set up!
Those pics would be good to see too.
Reply With Quote
  #5  
Old 02-09-2022, 02:11 PM
kcpi3141's Avatar
kcpi3141 kcpi3141 is offline
Member
 

Join Date: Mar 2021
Location: NYC, NY
Posts: 50
99% DIY Orchidarium Project Male
Default

Quote:
Originally Posted by nemesis View Post
I was just kidding lol. My son is currently building his Aqua scaping business. The beauty and complexity of those projects is truly amazing. The tanks sitting in our garage are a joy to behold. I can't wait to see your orchid set up!
Haha in my experience so far the term "aquascaping" is definitely not in the average person's vocabulary, so I tend to explain it whenever I can (Although I guess those on this forum aren't exactly in the "average person" category).
I am very thankful to see you supporting your son's interest in this! The only reason I have gotten this far and learned so much was because my parents supported me more than I could ever deserve. Keep it up and yes share some photos!

---------- Post added at 02:11 PM ---------- Previous post was at 01:48 PM ----------

The doors of the enclosure are 1/8" thick acrylic sheets, as that's lighter and less prone to breakage than glass. The protective film has not been removed yet in this picture, as it arrived the day before I had to leave for Christmas. You can also see my first little terrarium I mentioned in my first post chilling on the side .


Some blooms I got over the holidays when I got back. Second pic is Masdevallia 'Red Panda' (triangularis x princeps). And yes that is a random rose plant I just have that I got from NYBG.


Last edited by kcpi3141; 05-20-2022 at 01:44 AM..
Reply With Quote
  #6  
Old 02-10-2022, 10:20 AM
DirtyCoconuts's Avatar
DirtyCoconuts DirtyCoconuts is offline
Senior Member
 

Join Date: Sep 2019
Zone: 10b
Location: South Florida, East Coast
Posts: 5,838
99% DIY Orchidarium Project
Default

i am blown away- really nicely done- i will stay tuned!!
__________________
All the ways I grow are dictated by the choices I have made and the environment in which I live. Please listen and act accordingly
--------------------------------------------------------------
Rooted in South Florida....

Zone 10b, Baby! Hot and wet

#MoreFlowers Insta
#MoreFlowers Flickr
Reply With Quote
  #7  
Old 02-12-2022, 11:55 PM
kcpi3141's Avatar
kcpi3141 kcpi3141 is offline
Member
 

Join Date: Mar 2021
Location: NYC, NY
Posts: 50
99% DIY Orchidarium Project Male
Default

I used plastic egg crate and 3/4" PVC pipes to make a raised bed which will be most of the land portion. The random objects in the pic are for me to get a better idea of what the borders will be like.


The border separating the land from the water portion will be made out of black corrugated plastic sheets siliconed on to another layer of white corrugated plastic sheet that will lie flat on the ground. The white sheet will also help distribute the weight of rocks and other decor to prevent damage to the wooden Pond Armor floor. As I do not want to directly glue the background to the tank to aid in teardown in case anything happens (as I am in school), for the background I carefully cut out 1" thick insulation foam and stuffed them together. The friction is more than enough to secure them and more foam that is coming later will further stabilize them so they won't fall forward.


From here on out it will be slowly adding foam to fill up and scape the land portion while securing everything in place, including the PVC drip-wall system you can see a part of in the picture above. I also drilled an overflow to keep the water level steady at about 7" high and will have a bucket underneath to drain it. The bulkhead and spigot are just a 3/4" rainwater barrel faucet attachment I found on Amazon. I also have a sprinkler riser that screws into the bulkhead to adjust the height of the water. Since I plan to have the misting system add more water than what evaporation will remove, the aquatic portion will essentially have a constant tiny water change, although once in a while I will perform a bigger one.


Will put this on hold for a couple of weeks because I will need to recover from a wrist surgery. Once I get better I will send more updates!
Reply With Quote
  #8  
Old 04-25-2022, 05:09 PM
DirtyCoconuts's Avatar
DirtyCoconuts DirtyCoconuts is offline
Senior Member
 

Join Date: Sep 2019
Zone: 10b
Location: South Florida, East Coast
Posts: 5,838
99% DIY Orchidarium Project
Default

you can always keep them in pots until the next new growth....dont rush or force anything in a tank...all mistakes are amplified by 100
__________________
All the ways I grow are dictated by the choices I have made and the environment in which I live. Please listen and act accordingly
--------------------------------------------------------------
Rooted in South Florida....

Zone 10b, Baby! Hot and wet

#MoreFlowers Insta
#MoreFlowers Flickr
Reply With Quote
Post Thanks / Like - 1 Likes
Likes tmoney liked this post
  #9  
Old 04-25-2022, 11:11 PM
estación seca's Avatar
estación seca estación seca is offline
Senior Member
 

Join Date: Jun 2015
Zone: 9b
Location: Phoenix AZ - Lower Sonoran Desert
Posts: 18,087
99% DIY Orchidarium Project Male
Default

One thing I had to keep telling myself when I grew orchids in the school dorm - studying before orchids. Be sure you get enough sleep or you won't retain what you read.
__________________
May the bridges I've burned light my way.

Weather forecast for my neighborhood
Reply With Quote
  #10  
Old 04-30-2022, 02:10 AM
kcpi3141's Avatar
kcpi3141 kcpi3141 is offline
Member
 

Join Date: Mar 2021
Location: NYC, NY
Posts: 50
99% DIY Orchidarium Project Male
Default

I appreciate all the advice haha and yes I am trying to sleep better. Finished with finals for cardiology and pulmonary, so had a little free time to work on it at last. Current update:

Initial planting completed and replaced the acrylic doors. The plants were secured with U-shaped metal pins I made with stainless steel wire. So many things still left to do such as installing the automation, fans, painting the PVC pipe black etc., but at least it is somewhat functional in keeping a humid growing environment. As I keep adding things, the plants, moss, and charcoal will break up the artificiality of the foam background and should look pretty good when mature, but that will take quite a while to get too.


The mounted plants from left and going clockwise (minus the misc. Tillandsias):
- Potinara Burana Beauty 'Burana' (the cattleya)
- Broughtonia Jamaica Jester (negrilensis x ortgiesiana)
- Tolumnia varietgata
- Brassavola nodosa
- Ascocentrum ampullaceum
- Cattleya schilleriana
- Neofinitia falcata
- Tolumnia Kalapana Red


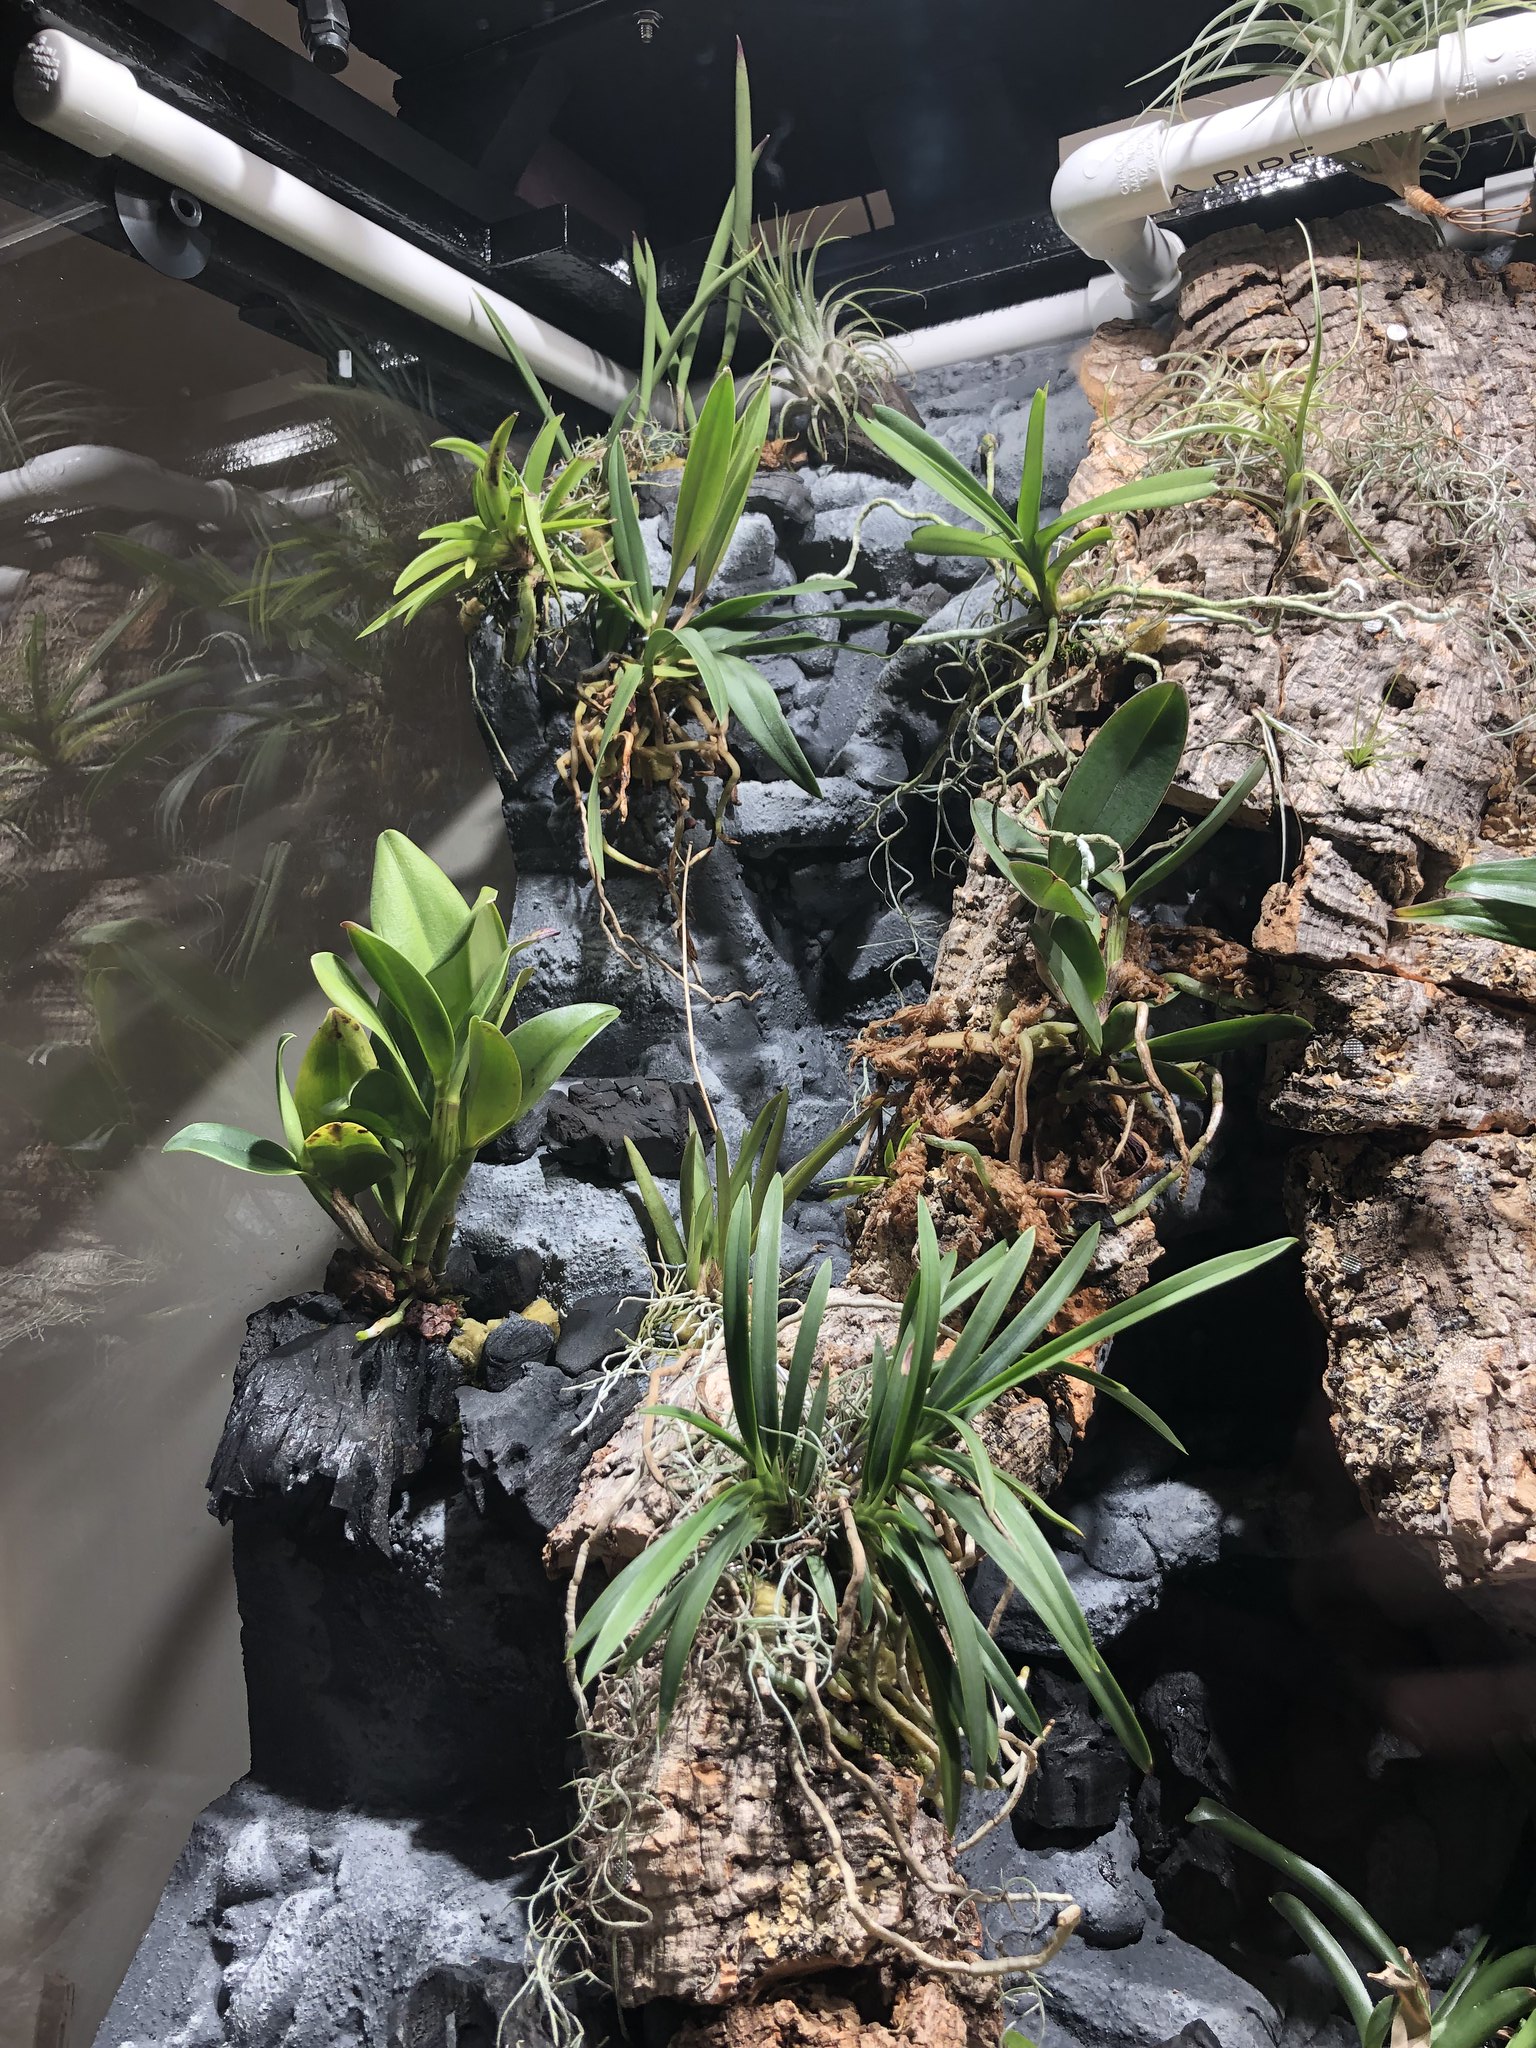
This area will not be watered with the dripwall system during 1 or 2 of the winter months, as these plants prefer a drier winter rest. There will still be misting, however. As a result, this area will look more "scrubby" with less moss compared to the rest, and so I might add some larger lichens to fill up the space. Planning also to eventually find some rupicolous laelias to put here as well, as it also has the highest light. The rest of the enclosure will be pretty consistent throughout the year though.
Reply With Quote
Post Thanks / Like - 2 Likes
Likes Fuerte Rav, tmoney liked this post
Reply

Bookmarks

Tags
orchids, pics, project, time, water


Currently Active Users Viewing This Thread: 1 (0 members and 1 guests)
 

Posting Rules
You may not post new threads
You may not post replies
You may not post attachments
You may not edit your posts

BB code is On
Smilies are On
[IMG] code is On
HTML code is Off


Similar Threads
Thread Thread Starter Forum Replies Last Post
Projects - What Are They & Previous Project Plants RosieC Member Projects 1 12-30-2023 01:40 PM
My orchidarium project Vida Terrarium Gardening 1 03-12-2021 02:55 PM
The Windowsill Orchidarium Project sesh Windowsill Growing 3 12-16-2019 05:19 AM
Summer 2010 plant project suggestions flhiker Member Projects 288 08-09-2010 08:37 PM
Spring 2010 project sign up! flhiker Member Projects 204 04-05-2010 05:00 PM

All times are GMT -4. The time now is 06:06 PM.

© 2007 OrchidBoard.com
Search Engine Optimisation provided by DragonByte SEO v2.0.37 (Lite) - vBulletin Mods & Addons Copyright © 2024 DragonByte Technologies Ltd.
Feedback Buttons provided by Advanced Post Thanks / Like (Lite) - vBulletin Mods & Addons Copyright © 2024 DragonByte Technologies Ltd.

Clubs vBulletin Plugins by Drive Thru Online, Inc.